-
Shop
- Adidas
- Advanced Technologies
- AI Skills Mastery 2026 Collection
- Best-Sellers
- Calvin Klein
- Car Accessories
- Confidence
- Dating & Social Skills
- Digital Resources
- AI & Technology
- AI Skills
- Beauty
- Budgeting & Saving
- Car Buying & Ownership
- Cozy Feast Collection
- Electronics & Technology
- Entrepreneurship & Business Growth
- Financial Education
- Financial Independence
- Financial Mindset & Psychology
- Goal Setting
- Hobbies
- Home Styling & Organization
- Kitchen & Recipes
- Leadership
- Mindset
- Online Business
- Parenting & Child Development
- Personal Style & Fashion
- Pet Lifestyle & Wellness
- Positive Thinking
- Sleep Improvement
- Stress Management & Relaxation
- Travel Planning
- Yoga & Fitness
- Yoga & Mind-Body Practices
- Education & Learning
- Family & Parenting
- Fashion
- Alexander McQueen
- Bags
- Bags & Wallets
- Balenciaga
- Belts
- Blazers
- Bottega Veneta
- Brunello Cucinelli
- Burberry
- Chanel
- Chloé
- Dior
- Dolce & Gabbana
- Dresses
- Etro
- Fendi
- Gucci
- Hats & Hair Accessories
- Hoodies & Sweatshirts
- Jacquemus
- Jewelry
- Jil Sander
- Keychains
- Kiton
- Luggage
- Miu Miu
- Off-White
- Prada
- Rick Owens
- Saint Laurent
- Socks & Tights
- Sweaters & Cardigans
- The Row
- Tom Ford
- Tops & Shirts
- Valentino
- Valentino Garavani
- Versace
- Vivienne Westwood
- Watches
- Furniture
- Gadgets
- Health & Beauty
- Health & Wellness
- Home & Garden
- Kids & Babies
- Kitchen
- Lighting
- Patio, Lawn & Garden
- Personal Growth
- Pet Care
- Pet Supplies
- Pets
- Shoes
- Smart Home Living Guides
- Sport & Outdoors
- Stress Relief & Relaxation
- TikTok Growth & Monetization Mastery
- Travel
- Travel & Adventure
- Wealth
- Wellness
- YouTube Shorts Best-Sellers
- Popular
- Best deals
Stainless Steel Cuticle Remover Kit for Smooth Nail Prep
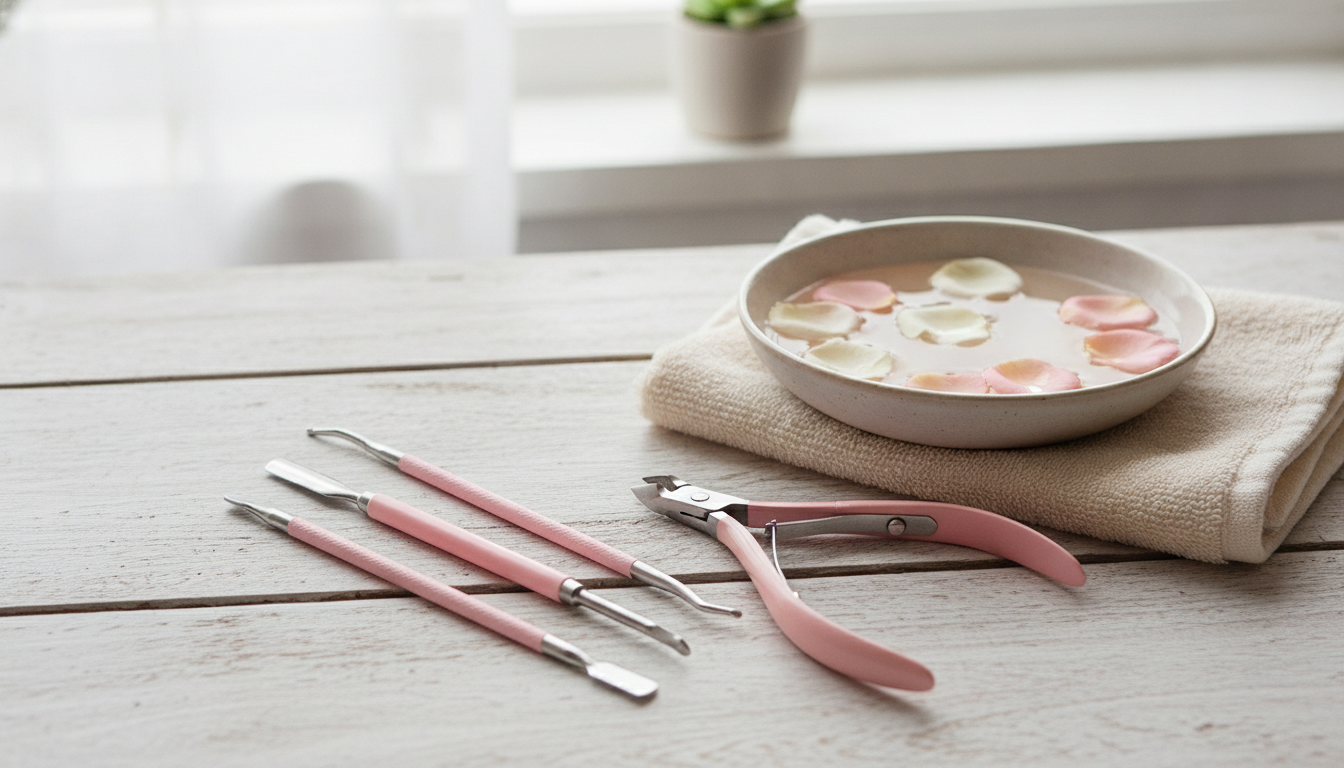
Stainless Steel Cuticle Remover Kit: Clean, Precise Nail Prep at Home
A stainless steel cuticle remover kit helps tidy overgrown cuticles, lift non-living tissue, and refine nail edges with more control than disposable tools. With the right technique—and consistent cleaning—you can get a smoother cuticle line that makes polish, gel, and press-ons look cleaner while helping protect the nail plate and surrounding skin.
What a Stainless Steel Cuticle Remover Kit Is Used For
Cuticles play an important protective role, but the thin, non-living tissue that builds up on the nail plate can make manicures look uneven or cause premature lifting. A well-made stainless steel kit supports neat, detail-oriented prep without relying on flimsy, single-use tools.
- Removes non-living cuticle tissue that can make polish application uneven or cause lifting
- Helps lift and gently push back cuticles after softening with warm water or remover
- Refines hangnails and small rough edges when used carefully (not for deep trimming)
- Supports cleaner nail prep for manicures, pedicures, gel, and press-on application
For a simple at-home setup, start with a dedicated cuticle tool set like the Stainless Steel Cuticle Remover Kit and pair it with a steady routine (so you don’t feel tempted to over-trim all at once).
Common Tools in a Cuticle Kit and What Each One Does
Most kits combine a few essential shapes. Each tool has a “sweet spot” where it works best, and using the right one at the right moment is what keeps prep clean instead of harsh.
- Cuticle pusher: moves softened cuticle back from the nail plate with light pressure
- V-shaped or forked trimmer: targets thin, dead tissue along the cuticle line (use sparingly)
- Cuticle knife/scraper edge: lifts residue from the nail plate after softening
- Nail file or buffer (if included): smooths edges and evens the surface before polish
- Grip and balance matter: textured handles reduce slipping, especially on damp hands
| Tool | Primary purpose | Best time to use | Key tip |
|---|---|---|---|
| Cuticle pusher | Gently pushes back softened cuticle | After soaking or cuticle remover | Keep the angle low; avoid digging into the nail |
| V-shaped trimmer | Removes thin dead cuticle tissue | After pushing back and identifying non-living tissue | Trim only what lifts easily; stop at redness |
| Scraper/knife edge | Lifts residue from nail plate | After cuticle is softened | Use light strokes; never carve the nail |
| File/buffer (if included) | Smooths free edge and surface | After cuticle work, before polish | Buff lightly to avoid thinning the nail |
Why Stainless Steel Makes a Difference
Material choice affects how controlled your cuticle work feels—and how hygienic your tools remain over time. Stainless steel is a favorite for home and professional use because it combines stability, cleanability, and consistent edges.
- More durable than flimsy plastic tools and less likely to warp or crack under pressure
- Can be cleaned and disinfected more reliably than porous materials
- Sharper edges stay consistent longer, improving control with fewer passes
- Feels more stable in hand, which can reduce accidental slips
- Look for smooth finishing on edges and comfortable handle knurling for safer grip
Good nail care is also about overall hygiene habits. The American Academy of Dermatology offers practical guidance on everyday nail care basics (AAD: Nail care basics), and the CDC’s hand hygiene recommendations are a helpful reminder for cleaning hands before and after grooming (CDC: Healthy Habits—Hand Hygiene).
How to Use the Kit for a Neat Cuticle Line (Step by Step)
A neat result comes from softening first and working in small, controlled motions. Rushing (or working dry) is where most irritation happens.
- Soften first: wash hands, then soak fingertips in warm water for 3–5 minutes or apply a cuticle softener as directed.
- Dry and assess: pat dry and identify only the thin, translucent tissue that is ready to lift; avoid intact living skin.
- Push back gently: use a cuticle pusher with a low angle, moving from the center outward with light pressure.
- Lift residue: use the scraper edge to sweep away softened cuticle from the nail plate in short, controlled strokes.
- Trim only when needed: if non-living cuticle is visibly lifted, use the V-trimmer to snip tiny bits that release easily.
- Finish: rinse, dry, apply cuticle oil, and moisturize; wait for skin to calm before using strong actives around nails.
If you’re doing a full at-home reset, set up a comfortable station so your hands stay steady—some people like a clear surface with drawers nearby (for tools, cotton pads, and oil), such as the Solid Wood Coffee Table with Storage Drawers as an organizing piece in a beauty corner.
Cleaning, Disinfecting, and Storing Nail Tools
Clean tools are safer tools. Even stainless steel needs proper washing and thorough drying to keep edges smooth and to reduce contamination risk.
Safety Notes and When to Avoid Trimming
A Simple Routine for Long-Lasting Results
To round out an at-home “spa day” routine, some people like adding heat and relaxation before grooming; the Infrared Sauna for One Person can help create a calm, unhurried setup so detailed work feels easier and more controlled.
FAQ
Is it better to cut cuticles or push them back?
Gentle pushing after softening is usually preferred. Trimming should be limited to non-living tissue that’s already lifted, since cutting into living skin can increase irritation and infection risk.
How often should cuticle tools be disinfected?
Clean and disinfect tools after every use, following the disinfectant label’s directions for contact time. Keep tools dry in storage and avoid sharing them to reduce contamination risk.
Why do cuticles look ragged again a few days after trimming?
Ragged edges often come from dryness, trimming too much, or picking at the area as it heals. Daily cuticle oil, gentler maintenance, and avoiding aggressive cutting help keep the cuticle line smoother for longer.


Leave a comment