-
Shop
- Adidas
- Advanced Technologies
- AI Skills Mastery 2026 Collection
- Best-Sellers
- Calvin Klein
- Car Accessories
- Confidence
- Dating & Social Skills
- Digital Resources
- AI & Technology
- AI Skills
- Beauty
- Budgeting & Saving
- Car Buying & Ownership
- Cozy Feast Collection
- Electronics & Technology
- Entrepreneurship & Business Growth
- Financial Education
- Financial Independence
- Financial Mindset & Psychology
- Goal Setting
- Hobbies
- Home Styling & Organization
- Kitchen & Recipes
- Leadership
- Mindset
- Online Business
- Parenting & Child Development
- Personal Style & Fashion
- Pet Lifestyle & Wellness
- Positive Thinking
- Sleep Improvement
- Stress Management & Relaxation
- Travel Planning
- Yoga & Fitness
- Yoga & Mind-Body Practices
- Education & Learning
- Family & Parenting
- Fashion
- Alexander McQueen
- Bags
- Bags & Wallets
- Balenciaga
- Belts
- Blazers
- Bottega Veneta
- Brunello Cucinelli
- Burberry
- Chanel
- Chloé
- Dior
- Dolce & Gabbana
- Dresses
- Etro
- Fendi
- Gucci
- Hats & Hair Accessories
- Hoodies & Sweatshirts
- Jacquemus
- Jewelry
- Jil Sander
- Keychains
- Kiton
- Luggage
- Miu Miu
- Off-White
- Prada
- Rick Owens
- Saint Laurent
- Socks & Tights
- Sweaters & Cardigans
- The Row
- Tom Ford
- Tops & Shirts
- Valentino
- Valentino Garavani
- Versace
- Vivienne Westwood
- Watches
- Furniture
- Gadgets
- Health & Beauty
- Health & Wellness
- Home & Garden
- Kids & Babies
- Kitchen
- Lighting
- Patio, Lawn & Garden
- Personal Growth
- Pet Care
- Pet Supplies
- Pets
- Shoes
- Smart Home Living Guides
- Sport & Outdoors
- Stress Relief & Relaxation
- TikTok Growth & Monetization Mastery
- Travel
- Travel & Adventure
- Wealth
- Wellness
- YouTube Shorts Best-Sellers
- Popular
- Best deals
How to Create Waves with a 5-in-1 Curling Iron
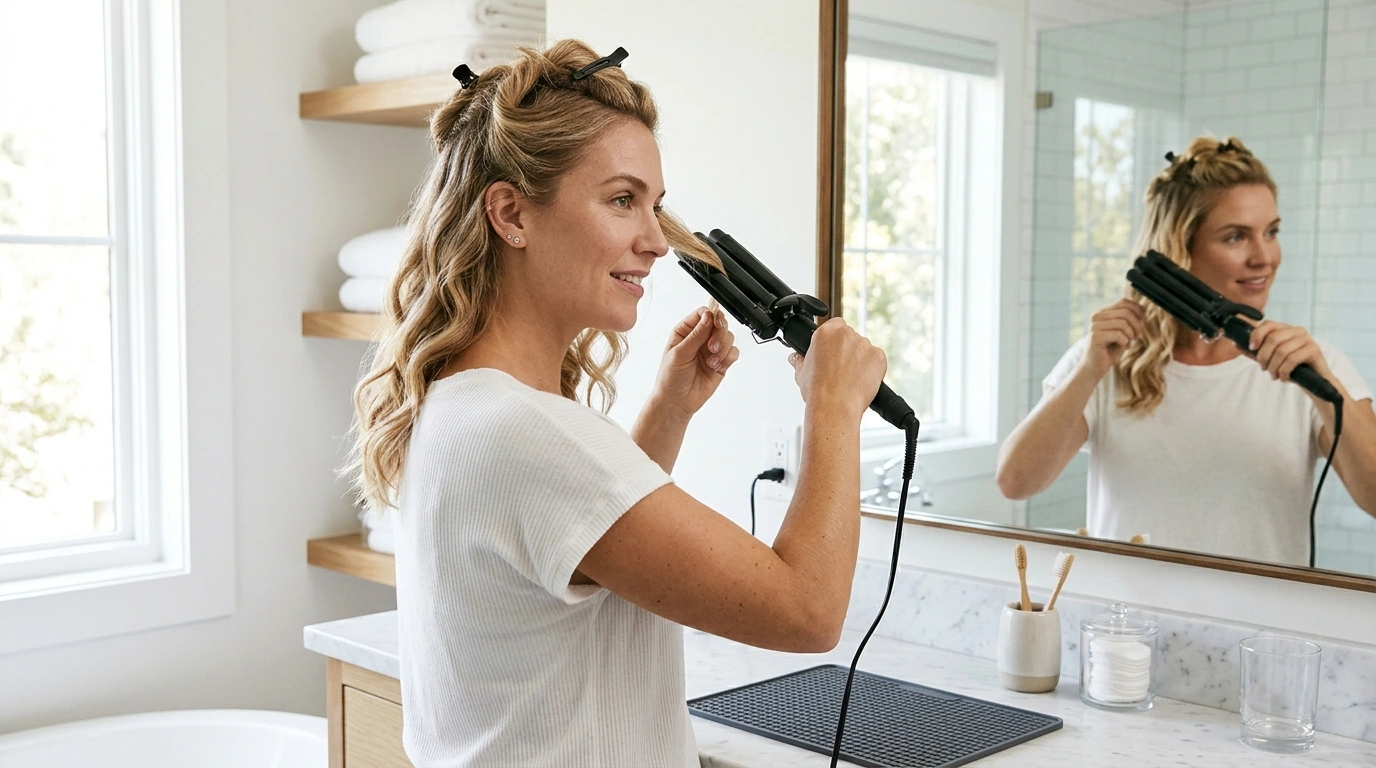
Waves can feel relaxed, polished, or somewhere in between. Our 5-in-1 Curling Iron and 3-Barrel Hair Crimper Waver offers a fast-heating option for working waves into your styling routine, with a design presented as suitable for all hair types. A little preparation and a gentle approach to heat can help you make the experience more comfortable, whatever look you have in mind.
Meet Your Wave-Making Tool
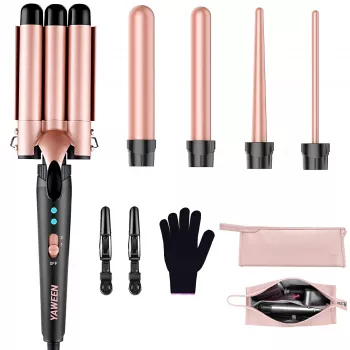
Our 5-in-1 curling iron and 3-barrel waver is a versatile addition to a routine that calls for more than one kind of finish. Its fast-heating design makes it a practical choice when you want to move from preparation to styling without a lengthy wait.
The waver is presented as suitable for all hair types, though your approach should reflect your hair’s condition and your preferred look. It is listed at $57.51; visit the product page for current availability and pricing.
Before you begin, read the included instructions for setting up and using the tool. That way, you can become familiar with its controls and any guidance specific to the attachment you plan to use.
Prepare Hair for Heat Styling
Start with clean, fully dry hair. Gently detangle from the ends upward, working through knots without pulling. Apply a heat protectant according to its directions, making sure you cover the lengths you plan to style. Heat protectant is a useful part of your routine, but it does not make hair immune to damage.
Next, divide your hair into manageable sections and clip away the pieces you are not working on. Sectioning gives you a clearer view and helps keep loose hair away from the hot tool. Choose a comfortable workspace with a mirror and enough room to set the waver down safely.
Keep the heated barrels away from your scalp, face, ears, neck, and hands. Follow the product instructions for setup, use, and temperature guidance rather than rushing through your first pass.
Build a Wave Routine for Your Hair
Begin with a small section and work from the upper lengths toward the ends, following the tool’s instructions. Keep the tool away from your scalp, and move methodically so you can see which sections you have already styled. Smaller sections can be easier to manage, especially when your hair is thick or prone to tangling.
As you release each section, give it time to cool before touching it. Once your hair has cooled, gently separate the waves with your fingers for a softer finish. If you prefer a more defined look, leave the sections more intact. A finishing product suited to your hair can add the hold or finish you want, but it is optional.
Wave styling starting points
| Hair type or condition | Starting approach | Finishing idea |
|---|---|---|
| Fine or fragile hair | Work gently in small sections and minimize heat exposure. | Separate waves lightly with your fingers. |
| Thick hair | Divide hair into smaller, manageable sections. | Allow waves to cool before loosening. |
| Curly or textured hair | Detangle gently and style fully dry sections. | Use a suitable finishing product if desired. |
These are starting points rather than rules. You may prefer different section sizes or finishing products as you learn how your hair responds. Pay particular attention to fragile areas, including hair that has been chemically treated or is already prone to breakage.
Keep Styling Comfortable and Safe
If your tool offers adjustable settings, use the lowest heat setting suitable for your hair. Avoid repeatedly heating the same section in pursuit of a stronger wave. Instead, let your hair cool and consider adjusting your section size or technique during a future styling session.
Place the hot tool on a heat-safe surface whenever you set it down. After styling, unplug it and allow it to cool completely before storing it. Keep the cord and hot surfaces clear of items that could be damaged by heat.
Stop heat styling if you notice signs of damage, such as increased dryness or breakage. Give your hair a break and consider asking a hair care professional for advice. For more everyday care guidance, visit the American Academy of Dermatology’s healthy hair tips.
Find Your Everyday Wave
For a relaxed look, let your waves cool and separate them gently with your fingers. For a more polished finish, keep the sections defined and use a light touch when adding your preferred styling product. You can also try styling fewer sections when you want a subtle change rather than an all-over wave.
If you are getting ready to head out, our Elegant Casual Leather Tote Bag for Everyday Style offers a place for your everyday essentials. Store your styling tool only after it has cooled completely. Ready to make waves? Explore our 5-in-1 curling iron and 3-barrel waver to find out more.
FAQ
Can the 3-barrel waver be used on all hair types?
The waver is presented as suitable for all hair types. Adapt your preparation and heat use to your hair’s condition, and work gently with fragile or damaged strands.
Should hair be wet or dry before using a waver?
Use the waver on fully dry, detangled hair. Apply a heat protectant according to its directions before styling.
How can waves be made to look softer?
Let each styled section cool, then gently separate the waves with your fingers instead of immediately brushing them out.
Recommended for you
A Gentle Guide to Progressive Relaxation
Nov 4, 2026










Leave a comment